
The last time I visited this hike, I was joined by my wife and two hikers who had never hiked here on Oahu before. We started by driving towards Palolo Valley and for Waiamao road (Directions to the start of the trail are at the bottom of the page) where the trail starts. We parked At the end of Waiamao road where there was about six parking spots on the right side of the road, just before the private driveway (I would suggest arriving early to make sure you get a spot). Directly across from the area where we parked was a shed. The four of us walked past the shed and down the gravel road for about ten seconds until we saw a "KAPU" sign on the left side of the road. This is where the trail starts. We headed into the woods and down the steep and muddy initial section of the trail, to reach the stream. Once we had negotiated the muddy section, we followed the stream upstream making numerous of stream crossings. There were lots of ribbons and the trail was very obvious. At any point in which the trail disappeared we just simply crossed the stream and the trail would reappear on the other side.
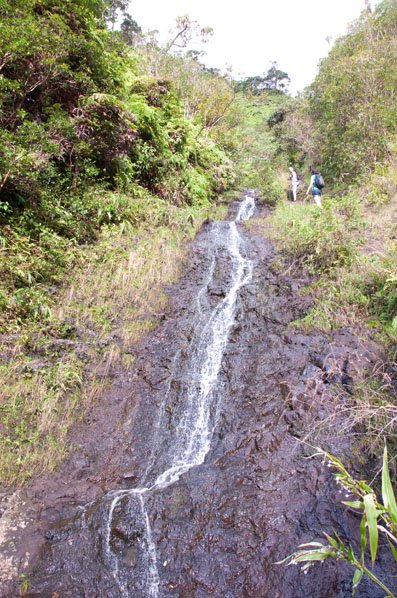
About ten or twenty minutes into the hike, we reached a massive water pipe on the left side of the stream. From this point on we simply followed the water pipe all the way to the first waterfall. Along the way were numerous of stream crossings and lots of mud. The trail eventually narrowed (The trail was still pretty wide though, but a slip could send you slipping a little bit of ways into the valley). This portion of the hike took us quite a while to finish, but only due to the muddy and slick conditions. After treking for quite some time we finally heard the noise of falling water to our right side and the first waterfall came in to sight. We took a faint trail down to it, being careful not to hurt ourselves, and then swam in the murky water for some time. The waterfall is probably around 50 or 60 feet and the swimming hole is only about five or six feet, but the waterfall is a beauty, especially if it has been raining lately.
After hanging out at the waterfall for a little bit our group climbed back up to the trail and found a little rock face with ropes in place. One has to be careful while doing this but overall it's a pretty easy climb. Shortly after making the climb up and heading just a little bit further upstream we reached the second waterfall. It was very similar in height to the first one and just as beautiful to look at. A few of us climbed under it to take some pictures while the others took their packs off and grabbed some water. This waterfall looks exceptionally nice if there's been a lot of rain lately, otherwise it's only looks sub-par in my opinion, but is still a nice waterfall overall, by Oahu standards.
Once we had exhausted our time at the second waterfall we found a trail on the right side of the stream and commenced climbing up it with the aid of some ropes. This was probably the most dangerous part of the hike. Once we were close to the top of the waterfall there was an insanely narrow section you must negotiate to get to the top of the waterfall and the next part of the trail. We all more or less hugged the cliff with our heels hanging over the ledge and safely proceeded across. This part really is dangerous, and all though it doesn't bother some people, such as my wife, if one were to fall here it would either kill them or seriously injury them. The problem with this section is that it is really narrow and if it's been raining is very slippery and makes it hard to cross without falling. A few years back, I saw first hand how dangerous this section can be and almost had my best friend fall off at this section, so be very careful if you proceed past here. Once to the top of the waterfall we crossed the stream and entered back into some trees and followed the easily identifiable trail for a few minutes until we reached the third waterfall.
Many people say there are three waterfalls here but in reality there are about seven or eight. The last five or six being all the same in height. Once we reached the third waterfall we grabbed the ropes and started climbing up the waterfall. This is a totally surreal experience. At points we were literally right next to the waterfall and climbing straight up it. As we climbed we were careful to watch our footing and to not take a tumble. A fall here could also seriously injure someone. We kept climbing and crossed the stream a few times, only to continue climbing another waterfall, and then another waterfall, and then another. After all the climbing, we ended up on the right side of the stream and made a somewhat tough climb (again with ropes) up the mountain and away from the stream. Within ten to fifteen minutes, views of Ka'au Crater opened up below us. It was a beautiful and we had no intentions of continuing around the rim, but like I said, it was a beautiful day, so we continued up the eat rim and towards the summit.
The climb to the summit was a little tiring and very steep at points, but just like the rest of the hike, there were plenty of ropes to aid in our ascent. Once at the summit we all took a breather and then headed down an insanely muddy stretch along the ridgeline. If one is affraid of heights this part might bother them, but overall is not to bad. Once we were done sliding down the muddy section, we continued around the ridge line and headed for the west rim. The trail is easy to follow and if you do end up going the wrong way, you will end up at Mt. Olympus, but if you just simply follow around the edge of the crater rim, you wont get lost. As we headed around the west rim and crept closer and closer to where the stream was, we noticed an insanely obvious junction on our right. It is almost impossible to miss.
After the long trip around the rim, we had finally reached our final leg of the hike. We took the junction and followed the trail all the way back down to the stream. It's not a short hike down, but when you get back to the stream there's a little pool that will greet you and that you can use to clean and cool off. From here we followed the water pipe that we had followed earlier, except this time we followed it down stream and within twenty or thirty minutes we were back to the start of the trail and our car.
I always end this hike by driving right down the street afterwards and visiting the beautiful Mu-Ryang-Su Buddhist Temple. If you merely look up, you will see the temple as you are leaving and it will be on the left side of the road just down the street from where your car was just parked. Visitors are welcomed to enter and walk around and picture taking is allowed. This is a must see place and I get a ton of joy every time I visit here. I'll update this blog with the exact street that it's on next time that I visit, but I don't know it at this moment, and to be honest you should have no problem locating it as you leave. No reason to say this, i'm sure, but be respectful if you enter.
Directions: Take H1 East towards Hawaii Kai and exit at Koko Head. Turn left on Koko Head avenue and then go down two blocks and turn left on to Waialae avenue. After two blocks on Waialae avenue, turn right on to 10th avenue. Drive up 10th avenue and at the fork, take a right on to Waiomao Road. Follow this road all the way to the end and park at a small turnout on the right with just a few parking spaces.


No comments:
Post a Comment